本文转自:https://www.cisco.com/c/en/us/td/docs/security/asa/asa98/configuration/vpn/asa-98-vpn-config/webvpn-configure-users.html
Chapter: Clientless SSL VPN Users
Chapter Contents
- Manage Passwords
- Use Single Sign-On with Clientless SSL VPN
- Username and Password Requirements
- Communicate Security Tips
- Configure Remote Systems to Use Clientless SSL VPN Features
Manage Passwords
Optionally, you can configure the ASA to warn end users when their passwords are about to expire.
The ASA supports password management for the RADIUS and LDAP protocols. It supports the “password-expire-in-days” option for LDAP only.
You can configure password management for IPsec remote access and SSL VPN tunnel-groups.
When you configure password management, the ASA notifies the remote user at login that the user’s current password is about to expire or has expired. The ASA then offers the user the opportunity to change the password. If the current password has not yet expired, the user can still log in using that password.
This command is valid for AAA servers that support such notification.
The ASA, releases 7.1 and later, generally supports password management for the following connection types when authenticating with LDAP or with any RADIUS configuration that supports MS-CHAPv2:
- AnyConnect VPN Client
- IPsec VPN Client
- Clientless SSL VPN
The RADIUS server (for example, Cisco ACS) could proxy the authentication request to another authentication server. However, from the ASA perspective, it is talking only to a RADIUS server.
Before you begin
- Native LDAP requires an SSL connection. You must enable LDAP over SSL before attempting to do password management for LDAP. By default, LDAP uses port 636.
- If you are using an LDAP directory server for authentication, password management is supported with the Sun Java System Directory Server (formerly named the Sun ONE Directory Server) and the Microsoft Active Directory.
- Sun—The DN configured on the ASA to access a Sun directory server must be able to access the default password policy on that server. We recommend using the directory administrator, or a user with directory administrator privileges, as the DN. Alternatively, you can place an ACI on the default password policy.
- Microsoft—You must configure LDAP over SSL to enable password management with Microsoft Active Directory.
- Some RADIUS servers that support MSCHAP currently do not support MSCHAPv2. This command requires MSCHAPv2 so check with your vendor.
- Password management is not supported for any of these connection types for Kerberos/Active Directory (Windows password) or NT 4.0 Domain.
- For LDAP, the method to change a password is proprietary for the different LDAP servers on the market. Currently, the ASA implements the proprietary password management logic only for Microsoft Active Directory and Sun LDAP servers.
- The ASA ignores this command if RADIUS or LDAP authentication has not been configured.
- The password-management command does not change the number of days before the password expires, but rather, the number of days ahead of expiration that the ASA starts warning the user that the password is about to expire.
Procedure
| Step 1 | Switch to general-attributes mode:tunnel-group general-attributes |
| Step 2 | Notify remote users that their password is about to expire:password-management password-expire-in-days daysExample: hostname(config-general)# password-management password-expire-in-days 90 If you specify the password-expire-in-days keyword, you must also specify the number of days.If you set the number of days to 0, this command is switched off.In this example, the ASA starts warning the user of the password expiration, 90 days before the expiration date.Note If the password-expire-in-days keyword is not set, the ASA does not notify the user of the pending expiration, but the user can change the password after it expires. |
Use Single Sign-On with Clientless SSL VPN
- SSO Using SAML 2.0
- Configure SSO with HTTP Basic or NTLM Authentication
- Configure SSO with the HTTP Form Protocol
- Configure SSO for Plug-ins
- Configure SSO with Macro Substitution
SSO Using SAML 2.0
- About SSO and SAML 2.0
- Guidelines and Limitations for SAML 2.0
- Configure a SAML 2.0 Identity Provider (IdP)
- Configure ASA as a SAML 2.0 Service Provider (SP)
- Example SAML 2.0 and Onelogin
- Troubleshooting SAML 2.0
About SSO and SAML 2.0
The ASA supports SAML 2.0 so that Clientless VPN end users will be able to input their credentials only one time when they switch between Clientless VPN and other SAAS applications outside of the private network.
For instance, an enterprise customer has enabled PingIdentity as their SAML Identity Provider (IdP) and has accounts on Rally, Salesforce, Oracle OEM, Microsoft ADFS, onelogin, or Dropbox which have been SAML 2.0 SSO enabled. When you configure the ASA to support SAML 2.0 SSO as a Service Provider (SP), end users are able to sign in once and have access to all these services including Clientless VPN.
In addition, AnyConnect SAML support was added to allow an AnyConnect 4.4 client to access SAAS-based applications using SAML 2.0. AnyConnect 4.6 introduces an enhanced version of SAML integration with an embedded browser which replaces the native (external) browser integration from previous releases. The new enhanced version with embedded browser requires you to upgrade to AnyConnect 4.6 (or later) and ASA 9.7.1.24 (or later), 9.8.2.28 (or later), or 9.9.2.1 (or later).
The ASA is SP enabled when SAML is configured as the authentication method for a tunnel group, the default tunnel group or any other. The Clientless VPN end user initiates Single sign-on by accessing an enabled ASA or the SAML IdP. Each of these scenarios is described below.
SAML SP-initiated SSO
When the end user initiates login by accessing the ASA using Clientless VPN, sign-on behavior proceeds as follows:
- When the Clientless VPN end user accesses or chooses a SAML enabled tunnel group, the end user will be redirected to the SAML idP for Authentication. The user will be prompted unless the user access the group-url directly, in which case the redirect is silent.The ASA generates a SAML Authentication Request which the browser redirects to the SAML IdP.
- The IdP challenges the end user for credential and the end user logs in. The entered credentials must satisfy the IdP authentication configuration.
- The IdP Response is sent back to the browser and posted to the ASA’s sign-in URL. The ASA verifies the response to complete the login.
SAML IdP-initiated SSL
When the user initiates login by accessing the IdP, sign-on behavior proceeds as follows:
- An end user accesses the IdP. The IdP challenges the end user for credentials according to the IdP’s authentication configuration. The end user submits credentials and logs in to the IdP.
- In general, the end user gets a list of SAML enabled services that have been configured with the IdP. The end user chooses the ASA.
- A SAML response is sent back to the browser, and posted to the ASA sign-in URL. The ASA verifies the response to complete the login.
Circle of Trust
The trust relationship between the ASA and the SAML Identity Provider is established through configured certificates (ASA trustpoints).
The trust relationship between the end user and SAML Identity Provider is established through the authentication configured on IdP.
SAML Timeouts
In SAML assertion, there are NotBefore and NotOnOrAfter as follows: <saml:Conditions NotBefore=”2015-03-10T19:47:41Z” NotOnOrAfter=”2015-03-10T20:47:41Z”>
A SAML timeout configured on the ASA will override NotOnOrAfter if the sum of NotBefore and timeout is earlier than NotOnOrAfter. If NotBefore + timeout is later than NotOnOrAfter, then NotOnOrAfter will take effect.
The timeout should be very short to prevent the assertion from being re-used after the timeout. You must synchronize your ASA’s Network Time Protocol (NTP) server with the IdP NTP server in order to use the SAML feature.
Support in Private Network
SAML 2.0-based service provider IdP is supported in a private network. When the SAML IdP is deployed in the private cloud, ASA and other SAML-enabled services are in peer positions, and all in the private network. With the ASA as a gateway between the user and services, authentication on IdP is handled with a restricted anonymous webvpn session, and all traffic between IdP and the user is translated. When the user logs in, the ASA modifies the session with the corresponding attributes and stores the IdP sessions. Then you can use service provider on the private network without entering credentials again.
The SAML IdP NameID attribute determines the user’s username and is used for authorization, accounting, and VPN session database.
 Note Note | You cannot exchange authentication information between private and public networks. If you use the same IdP for both internal and external service providers, you must authenticate separately. Internal-only IdP cannot be used with external services: external-only IdP cannot be used with service providers in the private network. |
Guidelines and Limitations for SAML 2.0
- SAML 2.0 SSO support is a Clientless VPN feature, so it has the same limitation and allowances as Clientless VPN such as:
- Multi-context mode and load balancing are not supported.
- Active/Standby failover is supported, not Active/Active failover.
- IPv4 and IPv6 sessions are supported.
- ASA supports SAML 2.0 Redirect-POST binding , which is supported by all SAML IdPs.
- The ASA functions as a SAML SP only. It cannot act as an Identity Provider in gateway mode or peer mode.
- This SAML SSO SP feature is a mutual exclusion authentication method. It cannot be used with AAA and certificate together.
- Features that are based on username/password authentication, certificate authentication, and KCD are not supported. For instance, username/password pre-filling feature, form-based Auto sign-on, Macro Substitution based Auto sign-on, KCD SSO, and so on.
- Having SAML authentication attributes available in DAP evaluation (similar to RADIUS attributes sent in RADIUS auth response from AAA server) is not supported.
- Existing Clientless VPN timeout settings still apply to SAML sessions.
- ASA administrators need to ensure clock synchronization between the ASA and the SAML IdP for proper handling of authentication assertions and proper timeout behavior.
- ASA administrators have the responsibility to maintain a valid signing certificate on both ASA and IdP considering the following:
- The IdP signing certificate is mandatory when configuring an IdP on the ASA.
- The ASA does not do a revocation check on the signing certificate received from the IdP.
- In SAML assertions, there are NotBefore and NotOnOrAfter conditions. The ASA SAML configured timeout interacts with these conditions as follows:
- Timeout overrides NotOnOrAfter if the sum of NotBefore and timeout is earlier than NotOnOrAfter.
- If NotBefore + timeout is later than NotOnOrAfter, then NotOnOrAfter takes effect.
- If the NotBefore attribute is absent, the ASA denies the login request. If the NotOnOrAfter attribute is absent and SAML timeout is not set, ASA denies the login request.
- When using SAML with AnyConnect, follow these additional guidelines
- Untrusted server certificates are not allowed in the embedded browser.
- The embedded browser SAML integration is not supported in CLI or SBL modes.
- SAML authentication established in a web browser is not shared with AnyConnect and vice versa.
- Depending on the configuration, various methods are used when connecting to the headend with the embedded browser. For example, while AnyConnect might prefer an IPv4 connection over an IPv6 connection, the embedded browser might prefer IPv6, or vice versa. Similarly, AnyConnect may fall back to no proxy after trying proxy and getting a failure, while the embedded browser may stop navigation after trying proxy and getting a failure.
- You must synchronize your ASA’s Network Time Protocol (NTP) server with the IdP NTP server in order to use the SAML feature.
- The VPN Wizard on ASDM does not currently support SAML configurations.
- You cannot access internal servers with SSO after logging in using an internal IdP.
- The SAML IdP NameID attribute determines the user’s username and is used for authorization, accounting, and VPN session database.
Configure a SAML 2.0 Identity Provider (IdP)
Before you begin
Get the Sign-in and Sign-out URLs for your SAML (IdP) provider. You can get the URLs from the provider’s website, or they may provide that information in a metadata file.
Procedure
| Step 1 | Create a SAML identity provider in webvpn config mode and enter saml-idp sub-mode under webvpn.[no] saml idp idp-entityIDidp-entityID — The SAML IdP entityID must contain 4 to 256 characters.To remove a SAML IdP, use the no form of this command. |
| Step 2 | Configure the IdP URLs.url [sign-in | sign-out] valuevalue —This is the URL for signing into the IdP or the URL for redirecting to when signing out of the IdP. The sign-in URL is required, the sign-out URL is optional The url value must contain 4 to 500 characters. |
| Step 3 | (Optional) Configure the Clientless VPN base URL.base-url URLThis URL is provided to third-party IdPs to redirect end users back to the ASA.When base-url is configured, we use it as the base URL of the AssertionConsumerService and SingleLogoutService attribute in show saml metadata .When base-url is not configured, the URL is determined by the ASA’s hostname and domain-name. For example, we use https://ssl-vpn.cisco.com when hostname is ssl-vpn and domain-name is cisco.com.An error occurs if neither base-url nor the hostname/domain-name are configured when entering show saml metadata . |
| Step 4 | Configure trustpoints between the IdP and SP (ASA).trustpoint [idp | sp] trustpoint-nameidp —Specifies the trustpoint that contains the IdP certificate for the ASA to verify SAML assertions.sp —Specifies the trustpoint that contains the ASA (SP)’s certificate for the IdP to verify ASA’s signature or encrypted SAML assertion.trustpoint-name—Must be a previously configured trustpoint. |
| Step 5 | (Optional) Configure SAML timeout.timeout assertion timeout-in-secondsIf specified, this configuration overrides NotOnOrAfter if the sum of NotBefore and timeout-in-seconds is earlier than NotOnOrAfter.If not specified, NotBefore and NotOnOrAfter in the assertion is used to determine the validity.Note For a tunnel group with existing SAML IdP configured, any changes to the saml idp CLI under webvpn are only applied to the tunnel group when SAML is re-enabled for that particular tunnel group. After you configure the timeout, the updated timeout takes effect only after re-issuing the saml identity-provider CLI in the tunnel group webvpn-attributes. |
| Step 6 | (Optional) Enable or disable (default setting) the signature in SAML request.signature <value>Note With the upgrade to SSO 2.5.1, the default signing method changes from SHA1 to SHA256, and you can configure which signing method option you prefer by entering the value rsa-sha1, rsa-sha256, rsa-sha384, or rsa-sha512. |
| Step 7 | (Optional) To set the flag determining that the IdP is an internal network, use theinternal command. The ASA will then work in a gateway mode. |
| Step 8 | Use show webvpn saml idp to view the configuration. |
| Step 9 | Use force re-authentication to cause the identity provider to authenticate directly rather than rely on a previous security context when a SAML authentication request occurs. This setting is the default; therefore, to disable, use no force re-authentication . |
Example
The following example configures an IdP named salesforce_idp and uses preconfigured trustpoints:
ciscoasa(config)# webvpn
ciscoasa(config-webvpn)#saml idp salesforce_idp

ciscoasa(config-webvpn-saml-idp)#url sign-in https://asa-dev-ed.my.salesforce.com/idp/endpoint/HttpRedirect
ciscoasa(config-webvpn-saml-idp)#url sign-out https://asa-dev-ed.my.salesforce.com/idp/endpoint/HttpRedirect

ciscoasa(config-webvpn-saml-idp)#trustpoint idp salesforce_trustpoint
ciscoasa(config-webvpn-saml-idp)#trustpoint sp asa_trustpoint

ciscoasa(config)#show webvpn saml idp
saml idp salesforce_idp
url sign-in https://asa-dev-ed.my.salesforce.com/idp/endpoint/HttpRedirect
url sign-out https://asa-dev-ed.my.salesforce.com/idp/endpoint/HttpRedirect
trustpoint idp salesforce_trustpoint
trustpoint  sp asa_trustpoint
The following web page shows an example of how to get URLs for Onelogin,
The following web page is an example of how to use metadata to find the URLs from OneLogin.http://onlinehelp.tableau.com/current/online/en-us/saml_config_onelogin.htm
What to do next
Apply SAML authentication to connection profiles, as described in Configure ASA as a SAML 2.0 Service Provider (SP).
Configure ASA as a SAML 2.0 Service Provider (SP)
Follow this procedure to configure a particular tunnel group as a SAML SP.
| Note | If you are using SAML authentication with AnyConnect 4.4 or 4.5 and you deploy ASA version 9.7.1.24 (or later), 9.8.2.28 (or later), or 9.9.2.1 (or later) (Release Date: 18-APR-2018), the defaulted SAML behavior is the embedded browser, which is not supported on AnyConnect 4.4 and 4.5. Therefore, you must enable the saml external-browser command in tunnel group configuration in order for AnyConnect 4.4 and 4.5 clients to authenticate with SAML using the external (native) browser.The saml external-browser command is for migration purposes for those upgrading to AnyConnect 4.6 or later. Because of security limitations, use this solution only as part of a temporary migration while upgrading AnyConnect software. The command itself will be depreciated in the future. |
Before you begin
The IdP must have been previously configured. See Configure a SAML 2.0 Identity Provider (IdP).
Procedure
| Step 1 | In tunnel-group webvpn sub-mode, use the saml identify-provider command to assign an IdP.[no] saml identify-provider idp-entityIDidp-entityID —Must be one of the existing IdPs previously configured.To disable SAML SP, use the no form of this command. |
| Step 2 | Enable SAML SP feature for the current tunnel group.authentication samlSAML authentication method is mutually exclusive. |
Example
ciscoasa(config)# webvpn
ciscoasa(config-webvpn)# tunnel-group-list enable
ciscoasa(config)# tunnel-group cloud_idp_onelogin type remote-access
ciscoasa(config)# tunnel-group cloud_idp_onelogin webvpn-attributes
ciscoasa(config-tunnel-webvpn)# authentication saml
ciscoasa(config-tunnel-webvpn)# group-alias cloud_idp enable
ciscoasa(config-tunnel-webvpn)# saml identity-provider https://app.onelogin.com/saml/metadata/462950
Example SAML 2.0 and Onelogin
Follow this example using your third party SAML 2.0 IdP in place of the Onelogin information and naming.
- Set time synchronization between the IdP and the ASA(SP).
ciscoasa(config)# ntp server 209.244.0.4 - Obtain the IdP’s SAML metadata from the IdP following procedures provided by your third party IdP.
- Import the IdP’s signing certificate into a trustpoint.
ciscoasa(config)# crypto ca trustpoint onelogin ciscoasa(config-ca-trustpoint)# enrollment terminal ciscoasa(config-ca-trustpoint)# no ca-check ciscoasa(config-ca-trustpoint)# crypto ca authenticate onelogin Enter the base 64 encoded CA certificate. End with the word "quit" on a line by itself quit INFO: Certificate has the following attributes: Fingerprint: 85de3781 07388f5b d92d9d14 1e22a549 Do you accept this certificate? [yes/no]: yes Trustpoint CA certificate accepted. % Certificate successfully imported - Import the SP (ASA) signing PKCS12 into a trustpoint
ciscoasa(config)# crypto ca import asa_saml_sp pkcs12 password Enter the base 64 encoded pkcs12. End with the word "quit" on a line by itself: quit INFO: Import PKCS12 operation completed successfully - Add a SAML IdP:
ciscoasa(config-webvpn)# saml idp https://app.onelogin.com/saml/metadata/462950 - Configure attributes under saml-idp sub-mode:Configure the IdP sign-in URL and sign-ou URL:
ciscoasa(config-webvpn-saml-idp)# url sign-in https://ross.onelogin.com/trust/saml2/http-post/sso/462950 ciscoasa(config-webvpn-saml-idp)# url sign-out https://ross.onelogin.com/trust/saml2/http-redirect/slo/462950Configure the IdP trustpoint and the SP trustpointciscoasa(config-webvpn-saml-idp)# trustpoint idp onelogin ciscoasa(config-webvpn-saml-idp)# trustpoint sp asa_saml_spConfigure the Clientless VPN base URL, SAML request signature and SAML assertion timout:ciscoasa(config-webvpn-saml-idp)# base-url https://172.23.34.222 ciscoasa(config-webvpn-saml-idp)# signature ciscoasa(config-webvpn-saml-idp)# timeout assertion 7200 - Configure an IdP for a tunnel group and enable SAML authentication.
ciscoasa(config)# webvpn ciscoasa(config-webvpn)# tunnel-group-list enable ciscoasa(config)# tunnel-group cloud_idp_onelogin type remote-access ciscoasa(config)# tunnel-group cloud_idp_onelogin webvpn-attributes ciscoasa(config-tunnel-webvpn)# authentication saml ciscoasa(config-tunnel-webvpn)# group-alias cloud_idp enable ciscoasa(config-tunnel-webvpn)# saml identity-provider https://app.onelogin.com/saml/metadata/462950 - Show the ASA’s SAML SP metadata:You can get the ASA’s SAML SP metadata fromhttps://172.23.34.222/saml/sp/metadata/cloud_idp_onelogin. In the URL,cloud_idp_onelogin is the tunnel group name.
- Configure a SAML SP on your third party IdP following procedures provided by your third party IdP.
Troubleshooting SAML 2.0
Use debug webvpn samlvalue to debug SAML 2.0 behavior. The following SAML messages will be displayed depending on the value :
- 8—errors
- 16—warnings and errors
- 128 or 255—debug, warnings, and errors
Configure SSO with HTTP Basic or NTLM Authentication
This section describes single sign-on with HTTP Basic or NTLM authentication. You can configure the ASA to implement SSO using either or both of these methods. The auto-sign-on command configures the ASA to automatically pass Clientless SSL VPN user login credentials (username and password) on to internal servers. You can enter multiple auto-sign-on commands. The ASA processes them according to the input order (early commands take precedence). You specify the servers to receive the login credentials using either IP address and IP mask, or URI mask.
Use the auto-sign-on command in any of three modes: Clientless SSL VPN configuration, Clientless SSL VPN group-policy mode, or Clientless SSL VPN username mode. Username supersedes group, and group supersedes global. Choose the mode with the required scope of authentication:
| Mode | Scope |
|---|---|
| webvpn configuration | All Clientless SSL VPN users globally. |
| webvpn group-policy configuration | A subset of Clientless SSL VPN users defined by a group policy. |
| webvpn username configuration | An individual user of Clientless SSL VPN. |
Examples
- Configure auto-sign-on for all users of Clientless SSL VPN to servers with IP addresses ranging from 10.1.1.0 to 10.1.1.255 using NTLM authentication:
hostname(config-webvpn)# auto-sign-on allow ip 10.1.1.1 255.255.255.0 auth-type ntlm - Configure auto-sign-on for all users of Clientless SSL VPN, using basic HTTP authentication, to servers defined by the URI mask https://*.example.com/*:
hostname(config-webvpn)# auto-sign-on allow uri https://*.example.com/* auth-type - Configure auto-sign-on for Clientless SSL VPN sessions associated with the ExamplePolicy group policy, using either basic or NTLM authentication, to servers defined by the URI mask:
hostname(config)# group-policy ExamplePolicy attributes hostname(config-group-policy)# webvpn hostname(config-group-webvpn)# auto-sign-on allow uri https://*.example.com/* auth-type all - Configure auto-sign-on for a user named Anyuser to servers with IP addresses ranging from 10.1.1.0 to 10.1.1.255 using HTTP Basic authentication:
hostname(config)# username Anyuser attributes hostname(config-username)# webvpn hostname(config-username-webvpn)# auto-sign-on allow ip 10.1.1.1 255.255.255.0 auth-type basic - Configure auto-sign-on with a specific port and realm for authentication:
smart-tunnel auto-sign-on host-list [use-domain] [realm realm string] [port port num] [host host mask | ip address subnet mask]
Configure SSO with the HTTP Form Protocol
This section describes using the HTTP Form protocol for SSO. HTTP Form protocol is an approach to SSO authentication that can also qualify as a AAA method. It provides a secure method for exchanging authentication information between users of Clientless SSL VPN and authenticating Web servers. You can use it in conjunction with other AAA servers such as RADIUS or LDAP servers.
The ASA again serves as a proxy for users of Clientless SSL VPN to an authenticating Web server but, in this case, it uses HTTP Form protocol and the POST method for requests. You must configure the ASA to send and receive form data.
To configure SSO with the HTTP protocol correctly, you must have a thorough working knowledge of authentication and HTTP protocol exchanges.
As a common protocol, it is applicable only when the following conditions are met for the Web server application used for authentication:
- The authentication cookie must be set for successful request and not set for unauthorized logons. In this case, ASA cannot distinguish successful from failed authentication.
The following figure illustrates the SSO authentication steps, described below:
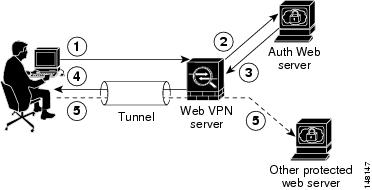
- A user of Clientless SSL VPN first enters a username and password to log on to the Clientless SSL VPN server on the ASA.
- The Clientless SSL VPN server acts as a proxy for the user and forwards the form data (username and password) to an authenticating Web server using a POST authentication request.
- If the authenticating Web server approves the user data, it returns an authentication cookie to the Clientless SSL VPN server where it is stored on behalf of the user.
- The Clientless SSL VPN server establishes a tunnel to the user.
- The user can now access other websites within the protected SSO environment without re-entering a username and password.
While you would expect to configure form parameters that let the ASA include POST data such as the username and password, you initially may not be aware of additional hidden parameters that the Web server requires. Some authentication applications expect hidden data which is neither visible to nor entered by the user. You can, however, discover hidden parameters the authenticating Web server expects by making a direct authentication request to the Web server from your browser without the ASA in the middle acting as a proxy. Analyzing the Web server response using an HTTP header analyzer reveals hidden parameters in a format similar to the following:
<param name>=<URL encoded value>&<param name>=<URL encoded>
Some hidden parameters are mandatory and some are optional. If the Web server requires data for a hidden parameter, it rejects any authentication POST request that omits that data. Because a header analyzer does not tell you if a hidden parameter is mandatory or not, we recommend that you include all hidden parameters until you determine which are mandatory.
To configure SSO with the HTTP Form protocol, you must perform the following:
- Configure the uniform resource identifier on the authenticating Web server to receive and process the form data (action-uri ).
- Configure the username parameter (user-parameter ).
- Configure the user password parameter (password-parameter ).
You may also need to do the following tasks depending upon the requirements of authenticating Web server:
- Configure a starting URL if the authenticating Web server requires a pre-login cookie exchange (start-url ).
- Configure any hidden authentication parameters required by the authenticating Web server (hidden-parameter ).
- Configure the name of an authentication cookie set by the authenticating Web server (auth-cookie-name ).
Procedure
| Step 1 | Switch to the aaa-server-host configuration mode:aaa-server-host |
| Step 2 | If the authenticating Web server requires it, specify the URL from which to retrieve a pre-login cookie from the authenticating Web server:start-urlExample: hostname(config)# aaa-server testgrp1 protocol http-form
hostname(config)# aaa-server testgrp1 host 10.0.0.2 hostname(config-aaa-server-host)# start-url http://example.com/east/Area.do?Page-Grp1 This example specifies the authenticating Web server URL http://example.com/east/Area.do?Page-Grp1 in the testgrp1 server group with an IP address of 10.0.0.2. |
| Step 3 | Specify a URI for an authentication program on the authenticating Web server:action-uriExample: http://www.example.com/auth/index.html/appdir/authc/forms/MCOlogin.fcc?TYPE=33554433 &REALMOID=06-000a1311-a828-1185-ab41-8333b16a0008&GUID=&SMAUTHREASON=0&METHOD=GET&SMAGENTNA ME=$SM$5FZmjnk3DRNwNjk2KcqVCFbIrNT9%2bJ0H0KPshFtg6rB1UV2PxkHqLw%3d%3d&TARGET=https%3A%2F%2F auth.example.com To specify this action URI, enter the following commands: hostname(config-aaa-server-host)# action-uri http://www.example.com/auth/index.htm hostname(config-aaa-server-host)# action-uri l/appdir/authc/forms/MCOlogin.fcc?TYP hostname(config-aaa-server-host)# action-uri 554433&REALMOID=06-000a1311-a828-1185 hostname(config-aaa-server-host)# action-uri -ab41-8333b16a0008&GUID=&SMAUTHREASON hostname(config-aaa-server-host)# action-uri =0&METHOD=GET&SMAGENTNAME=$SM$5FZmjnk hostname(config-aaa-server-host)# action-uri 3DRNwNjk2KcqVCFbIrNT9%2bJ0H0KPshFtg6r hostname(config-aaa-server-host)# action-uri B1UV2PxkHqLw%3d%3d&TARGET=https%3A%2F hostname(config-aaa-server-host)# action-uri %2Fauth.example.com A URI can be entered on multiple, sequential lines. The maximum number of characters per line is 255. The maximum number of characters for a complete URI is 2048.You must include the hostname and protocol in the action URI. In this example, these appear at the start of the URI in http://www.example.com. |
| Step 4 | Configure the userid username parameter for the HTTP POST request:user-parameterExample: hostname(config-aaa-server-host)# user-parameter userid |
| Step 5 | Configure the user_password user password parameter for the HTTP POST request:password-parameterExample: hostname(config-aaa-server-host)# password-parameter user_password |
| Step 6 | Specify hidden parameters for exchange with the authenticating Web server:hidden-parameterExample: hostname(config)# aaa-server testgrp1 host example.com hostname(config-aaa-server-host)# hidden-parameter SMENC=ISO-8859-1&SMLOCALE=US-EN&targe hostname(config-aaa-server-host)# hidden-parameter t=https%3A%2F%2Fwww.example.com%2Femc hostname(config-aaa-server-host)# hidden-parameter o%2Fappdir%2FAreaRoot.do%3FEMCOPageCo hostname(config-aaa-server-host)# hidden-parameter de%3DENG&smauthreason=0 This example shows an example hidden parameter excerpted from a POST request. This hidden parameter includes four form entries and their values, separated by &. The entries and their values are:SMENC with a value of ISO-8859-1.SMLOCALE with a value of US-EN.target with a value of https%3A%2F%2Fwww.example.com%2Femco%2Fappdir%2FAreaRoot.do.%3FEMCOPageCode%3DENG.smauthreason with a value of 0. |
| Step 7 | Specify the name for the authentication cookie:auth-cookie-name cookie-nameExample: hostname(config-aaa-server-host)# auth-cookie-name SsoAuthCookie This example specifies an authentication cookie name of SsoAuthCookie. |
| Step 8 | Switch to tunnel-group general-attributes configuration mode:tunnel-group general-attributes |
| Step 9 | Configure a tunnel-group to use the SSO server configured in the previous steps:authentication-server-groupExample: hostname(config)# tunnel-group testgroup general-attributes hostname(config-tunnel-general)#authentication-server-group testgrp1 This example configures the tunnel-group named /testgroup/ to use the SSO server(s) named /testgrp1/”. |
| Step 10 | Switch to AAA server host configuration mode:aaa-server-host |
| Step 11 | Specify the name for the authentication cookie:auth-cookie-name cookie-nameExample: hostname(config-aaa-server-host)# auth-cookie-name SsoAuthCookie This example specifies an authentication cookie name of SsoAuthCookie. |
| Step 12 | Switch to tunnel-group general-attributes mode:tunnel-group general-attributes |
| Step 13 | Configure a tunnel-group to use the SSO server configured in the previous steps:authentication-server-group groupExample: hostname(config)# tunnel-group testgroup general-attributes hostname(config-tunnel-general)#authentication-server-group testgrp1 This example configures a tunnel-group named /testgroup/ to use the SSO server(s) named /testgrp1/”. |
Gather HTTP Form Data
This section presents the steps for discovering and gathering necessary HTTP Form data. If you do not know what parameters the authenticating Web server requires, you can gather parameter data by analyzing an authentication exchange.
Before you begin
These steps require a browser and an HTTP header analyzer.
Procedure
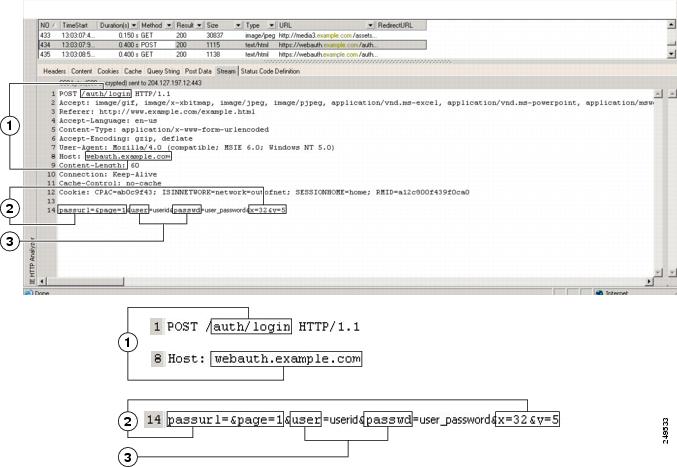
Configure SSO for Plug-ins
Plug-ins support single sign-on (SSO). They use the same credentials (username and password) entered to authenticate the Clientless SSL VPN session. Because the plug-ins do not support macro substitution, you do not have the option to perform SSO on different fields, such as the internal domain password or the attribute on a RADIUS or LDAP server.
To configure SSO support for a plug-in, you install the plug-in and add a bookmark entry to display a link to the server, specifying SSO support using the csco_sso=1 parameter. The following examples show plug-in bookmarks enabled for SSO:
ssh://ssh-server/?cisco_sso=1
rdp://rdp-server/?Parameter1=value&Parameter2=value&csco_sso=1
Configure SSO with Macro Substitution
This section describes using macro substitution for SSO. Configuring SSO with macro substitution allows for you to inject certain variables into bookmarks to substitute for dynamic values.
| Note | Smart tunnel bookmarks support auto-sign-on but not variable substitution. For example, a SharePoint bookmark configured for smart tunnel uses the same username and password credentials to log on to the application as the credentials used to log on to Clientless SSL VPN. (This SSO functionality applies only to clientless VPN and not to AnyConnect.) You can use variable substitutions and auto sign-on simultaneously or separately.You can now use bookmarks with macro substitutions for auto sign-on on some Web pages. The former POST plug-in approach was created so that administrators could specify a POST bookmark with sign-on macros and receive a kick-off page to load prior to posting the POST request. This POST plug-in approach eliminated those requests that required the presence of cookies or other header items. Now an an administrator determines the pre-load page and URL, which specifies where the post login request is sent. A pre-load page enables an endpoint browser to fetch certain information that is sent along to the webserver or Web application rather than just using a POST request with credentials. |
The following variables (or macros) allow for substitutions in bookmarks and forms-based HTTP POST operations:
- CSCO_WEBVPN_USERNAME—User login ID
- CSCO_WEBVPN_PASSWORD—User login password
- CSCO_WEBVPN_INTERNAL_PASSWORD—User internal (or domain) password. This cached credential is not authenticated against a AAA server. When you enter this value, the security appliance uses it as the password for auto sign-on, instead of the password/primary password value.NoteYou cannot use any of these three variables in GET-based http(s) bookmarks. Only POST-based http(s) and cifs bookmarks can use these variables.
- CSCO_WEBVPN_CONNECTION_PROFILE—User login group drop-down (connection profile alias)
- CSCO_WEBVPN_MACRO1—Set with the RADIUS-LDAP Vendor Specific Attribute (VSA). If you are mapping from LDAP with an ldap-attribute-map command, use the WebVPN-Macro-Substitution-Value1 Cisco attribute for this macro. See the Active Directory ldap-attribute-mapping examples athttp://www.cisco.com/en/US/docs/security/asa/asa83/configuration/guide/ref_extserver.html#wp1572118.The CSCO_WEBVPN_MACRO1 macro substitution with RADIUS is performed by VSA#223 .Table 1. VSA#223WebVPN-Macro-Value1Y223StringSingleUnboundedWebVPN-Macro-Value2Y224StringSingleUnboundedA value such as www.cisco.com/email dynamically populates a bookmark on the Clientless SSL VPN portal, such as https://CSCO_WEBVPN_MACRO1 or https://CSCO_WEBVPN_MACRO2 for the particular DAP or group policy.
- CSCO_WEBVPN_MACRO2—set with RADIUS-LDAP Vendor Specific Attribute (VSA). If you are mapping from LDAP with an ldap-attribute-map command, use the WebVPN-Macro-Substitution-Value2 Cisco attribute for this macro. See the Active Directory ldap-attribute-mapping examples athttp://www.cisco.com/en/US/docs/security/asa/asa83/configuration/guide/ref_extserver.html#wp1572118.The CSCO_WEBVPN_MACRO2 macro substitution with RADIUS is performed by VSA#224.
Each time Clientless SSL VPN recognizes one of these six strings in an end-user request (in the form of a bookmark or Post Form), it replaces the string with the user-specified value and then passes the request to a remote server.
If the lookup of the username and password fails on the ASA, an empty string is substituted, and the behavior converts back as if no auto sign-in is available.
Username and Password Requirements
Depending on your network, during a remote session users may have to log on to any or all of the following: the computer itself, an Internet service provider, Clientless SSL VPN, mail or file servers, or corporate applications. Users may have to authenticate in many different contexts, requiring different information, such as a unique username, password, or PIN. The following table lists the type of usernames and passwords that Clientless SSL VPN users may need to know:
| Login Username/ Password Type | Entered When | |
|---|---|---|
| Computer | Access the computer | Starting the computer |
| Internet Service Provider | Access the Internet | Connecting to an Internet service provider |
| Clientless SSL VPN | Access remote network | Starting Clientless SSL VPN |
| File Server | Access remote file server | Using the Clientless SSL VPN file browsing feature to access a remote file server |
| Corporate Application Login | Access firewall-protected internal server | Using the Clientless SSL VPN Web browsing feature to access an internal protected website |
| Mail Server | Access remote mail server via Clientless SSL VPN | Sending or receiving email messages |
Communicate Security Tips
Advise users to always click the logout icon on the toolbar to close the Clientless SSL VPN session. (Closing the browser window does not close the session.)
Clientless SSL VPN ensures the security of data transmission between the remote PC or workstation and the ASA on the corporate network. Advise users that using Clientless SSL VPN does not ensure that communication with every site is secure. If a user then accesses a non-HTTPS Web resource (located on the Internet or on the internal network), the communication from the corporate ASA to the destination Web server is not private because it is not encrypted.
Configure Remote Systems to Use Clientless SSL VPN Features
This section describes how to set up remote systems to use Clientless SSL VPN.
- About Clientless SSL VPN
- Prerequisites for Clientless SSL VPN
- Use the Clientless SSL VPN Floating Toolbar
- Browse the Web
- Browse the Network (File Management)
- Use Port Forwarding
- Use email Via Port Forwarding
- Use email Via Web Access
- Use email Via email Proxy
- Use Smart Tunnel
You may configure user accounts differently and different Clientless SSL VPN features can be available to each user.
- About Clientless SSL VPN
- Prerequisites for Clientless SSL VPN
- Use the Clientless SSL VPN Floating Toolbar
- Browse the Web
- Browse the Network (File Management)
- Use Port Forwarding
- Use email Via Port Forwarding
- Use email Via Web Access
- Use email Via email Proxy
- Use Smart Tunnel
About Clientless SSL VPN
You can connect to the internet using any supported connection including:
- Home DSL, cable, or dial-ups.
- Public kiosks.
- Hotel hotspots.
- Airport wireless nodes.
- Internet cafes.
| Note | See the Supported VPN Platforms, Cisco ASA 5500 Series for the list of Web browsers supported by Clientless SSL VPN. |
Prerequisites for Clientless SSL VPN
- Cookies must be enabled on the browser in order to access applications via port forwarding.
- You must have a URL for Clientless SSL VPN. The URL must be an https address in the following form: https://address, where address is the IP address or DNS hostname of an interface of the ASA (or load balancing cluster) on which SSL VPN is enabled. For example, https://cisco.example.com.
- You must have a Clientless SSL VPN username and password.NoteClientless SSL VPN supports local printing, but it does not support printing through the VPN to a printer on the corporate network.
Use the Clientless SSL VPN Floating Toolbar
A floating toolbar is available to simplify the use of Clientless SSL VPN. The toolbar lets you enter URLs, browse file locations, and choose preconfigured Web connections without interfering with the main browser window.
The floating toolbar represents the current Clientless SSL VPN session. If you click the Closebutton, the ASA prompts you to close the Clientless SSL VPN session.
 Tip Tip | To paste text into a text field, use Ctrl-V. (Right-clicking is switched off on the toolbar displayed during the Clientless SSL VPN session.) |
| Note | If you configure your browser to block popups, the floating toolbar cannot display. |
Browse the Web
Using Clientless SSL VPN does not ensure that communication with every site is secure. SeeCommunicate Security Tips.
The look and feel of Web browsing with Clientless SSL VPN may be different from what users are accustomed to. For example:
- The title bar for Clientless SSL VPN appears above each Web page.
- You access websites by:
- Entering the URL in the Enter Web Address field on the Clientless SSL VPN Home page
- Clicking on a preconfigured website link on the Clientless SSL VPN Home page
- Clicking a link on a webpage accessed via one of the previous two methods
- You need the username and password for protected websites
Depending on how you configured a particular account, it may be that:
- Some websites are blocked
- Only the websites that appear as links on the Clientless SSL VPN Home page are available
Also, depending on how you configured a particular account, it may be that:
- Some websites are blocked
- Only the websites that appear as links on the Clientless SSL VPN Home page are available
Browse the Network (File Management)
Users may not be familiar with how to locate their files through your organization network.
| Note | Do not interrupt the Copy File to Server command or navigate to a different screen while the copying is in progress. Interrupting the operation can cause an incomplete file to be saved on the server. |
It is important to remember that
- You must configure file permissions for shared remote access.
- You must have the server names and passwords for protected file servers.
- You must have the domain, workgroup, and server names where folders and files reside.
| Note | Only shared folders and files are accessible via Clientless SSL VPN. |
Use the Remote File Explorer
The Remote File Explorer provides the user with a way to browse the corporate network from their Web browser. When the users clicks the Remote File System icon on the Cisco SSL VPN portal page, an applet is launched on the user’s system displaying the remote file system in a tree and folder view.
| Note | This functionality requires that the Oracle Java Runtime Environment (JRE) is installed on the user’s machine and that Java is enabled in the Web browser. Launching remote files requires JRE 1.6 or later. |
The browser enables the user to:
- Browse the remote file system.
- Rename files.
- Move or copy files within the remote file system and between the remote and local file systems.
- Perform bulk uploads and downloads of files.You can download a file by clicking it in the browser, selecting Operations > Download, and providing a location and name to save the file in the Save dialog.You can upload a file by clicking the destination folder, selecting Operations > Upload, and providing the location and name of the file in the Open dialog,This functionality has the following restrictions:
- The user cannot view sub-folders for which they are not permitted access.
- Files that the user is not permitted to access cannot be moved or copied, even though they are displayed in the browser.
- The maximum depth of nested folders is 32.
- The tree view does not support drag and drop copying.
- When moving files between multiple instances of the Remote File Explorer, all instances must be exploring the same server (root share).
- The Remote File Explorer can display a maximum of 1500 files and folders in a single folder. If a folder exceeds this limit the folder cannot be displayed.
Use Port Forwarding
To use port forwarding, you must configure the client application, using the server’s locally mapped IP address and port number.
- Users should always close the Application Access window when they finish using applications by clicking the Close icon. Failure to quit the window properly can cause Application Access or the applications themselves to be switched off.
Before you begin
- On Mac OS X, only the Safari browser supports this feature.
- You must have client applications installed.
- You must have Cookies enabled on the browser.
- You must have administrator access on the PC if you use DNS names to specify servers, because modifying the hosts file requires it.
- You must have Oracle Java Runtime Environment (JRE) installed.If JRE is not installed, a pop-up window displays, directing users to a site where it is available. On rare occasions, the port forwarding applet fails with Java exception errors. If this happens, do the following:
- Clear the browser cache and close the browser.
- Verify that no Java icons are in the computer task bar.
- Close all instances of Java.
- Establish a Clientless SSL VPN session and launch the port forwarding Java applet.
- You must have JavaScript enabled on the browser. By default, it is enabled.
- If necessary, you must configure client applications.NoteThe Microsoft Outlook client does not require this configuration step. All non-Windows client applications require configuration. To determine if configuration is necessary for a Windows application, check the value of the Remote Server field. If the Remote Server field contains the server hostname, you do not need to configure the client application. If the Remote Server field contains an IP address, you must configure the client application.
Procedure
| Step 1 | Start a Clientless SSL VPN session and click the Application Access link on the Home page. The Application Access window appears. |
| Step 2 | In the Name column, find the name of the server to use, then identify its corresponding client IP address and port number (in the Local column). |
| Step 3 | Use this IP address and port number to configure the client application. Configuration steps vary for each client application.Note Clicking a URL (such as one in an -email message) in an application running over a Clientless SSL VPN session does not open the site over that session. To open a site over the session, paste the URL into the Enter Clientless SSL VPN (URL) Address field. |
Use email Via Port Forwarding
To use email, start Application Access from the Clientless SSL VPN home page. The mail client is then available for use.
| Note | If you are using an IMAP client and you lose your mail server connection or are unable to make a new connection, close the IMAP application and restart Clientless SSL VPN. |
You must fulfill requirements for application access and other mail clients.
We have tested Microsoft Outlook Express versions 5.5 and 6.0.
Use email Via Web Access
The following email applications are supported:
- Microsoft Outlook Web App to Exchange Server 2010.OWA requires Internet Explorer 7 or later, or Firefox 3.01 or later.
- Microsoft Outlook Web Access to Exchange Server 2007, 2003, and 2000.For best results, use OWA on Internet Explorer 8.x or later, or Firefox 8.x.
- Lotus iNotesNoteYou must have the web-based email product installed and other web-based email applications should also work, but we have not verified them.
Use email Via email Proxy
The following legacy email applications are supported:
- Microsoft Outlook 2000 and 2002
- Microsoft Outlook Express 5.5 and 6.0
See the instructions and examples for your mail application in Use Email over Clientless SSL VPN.
Before You Begin
You must have the SSL-enabled mail application installed.
Do not set the ASA SSL version to TLSv1 Only. Outlook and Outlook Express do not support TLS.
You must have your mail application properly configured.
Other SSL-enabled clients should also work, but we have not verified them.
Use Smart Tunnel
Administration privileges are not required to use Smart Tunnel.
| Note | Java is not automatically downloaded for you as in port forwarder. |
- Smart tunnel requires either ActiveX or JRE on Windows and Java Web Start on Mac OS X.
- You must ensure cookies enabled on the browser.
- You must ensure JavaScript is enabled on the browser.
- Mac OS X does not support a front-side proxy.
- Use only supported operating systems and browsers.
- Only TCP socket-based applications are supported.
评论