本文转自:https://www.cisco.com/c/en/us/td/docs/security/asa/asa98/configuration/vpn/asa-98-vpn-config/webvpn-customizing.html
Chapter: Customizing Clientless SSL VPN
Chapter Contents
Clientless SSL VPN End User Setup
This section is for the system administrator who sets up Clientless SSL VPN for end users. It describes how to customize the end-user interface and summarizes configuration requirements and tasks for a remote system. It specifies information to communicate to users to get them started using Clientless SSL VPN.
- Define the End User Interface
- Customize Clientless SSL VPN Pages
- Information About Customization
- Export a Customization Template
- Edit the Customization Template
- Import a Customization Object
- Apply Customizations to Connection Profiles, Group Policies, and Users
- Login Screen Advanced Customization
- Modify Your HTML File
Define the End User Interface
The Clientless SSL VPN end user interface consists of a series of HTML panels. A user logs on to Clientless SSL VPN by entering the IP address of an ASA interface in the format https://address. The first panel that displays is the login screen.
- View the Clientless SSL VPN Home Page
- View the Clientless SSL VPN Application Access Panel
- View the Floating Toolbar
View the Clientless SSL VPN Home Page
After the user logs in, the portal page opens.
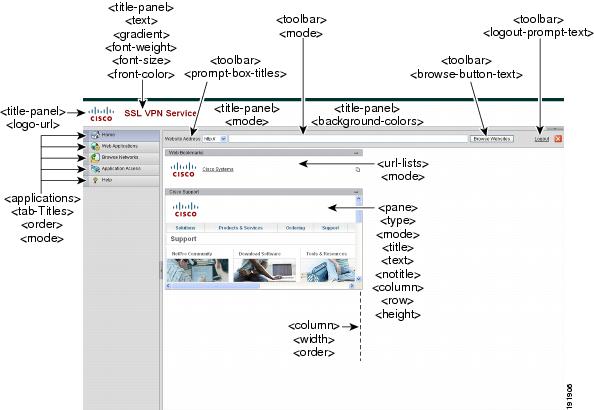
The home page displays all of the Clientless SSL VPN features you have configured, and its appearance reflects the logo, text, and colors you have selected. This sample home page includes all available Clientless SSL VPN features with the exception of identifying specific file shares. It lets users browse the network, enter URLs, access specific websites, and use Application Access (port forwarding and smart tunnels) to access TCP applications.
View the Clientless SSL VPN Application Access Panel
To start port forwarding or smart tunnels, a user clicks the Go button in the Application Access box. The Application Access window opens and displays the TCP applications configured for this Clientless SSL VPN connection. To use an application with this panel open, the user starts the application in the normal way.
 Note Note | A stateful failover does not retain sessions established using Application Access. Users must reconnect following a failover. |
View the Floating Toolbar
The floating toolbar shown in the following figure represents the current Clientless SSL VPN session.

Be aware of the following characteristics of the floating toolbar:
- The toolbar lets you enter URLs, browse file locations, and choose preconfigured Web connections without interfering with the main browser window.
- If you configure your browser to block popups, the floating toolbar cannot display.
- If you close the toolbar, the ASA prompts you to end the Clientless SSL VPN session.
Customize Clientless SSL VPN Pages
You can change the appearance of the portal pages displayed to Clientless SSL VPN users. This includes the Login page displayed to users when they connect to the security appliance, the Home page displayed to users after the security appliance authenticates them, the Application Access window displayed when users launch an application, and the Logout page displayed when users log out of Clientless SSL VPN sessions.
After you customize the portal pages, you can save your customization and apply it to a specific connection profile, group policy, or user. The changes do not take effect until you reload the ASA, or you switch off and then enable clientless SSL.
You can create and save many customization objects, enabling the security appliance to change the appearance of portal pages for individual users or groups of users.
Information About Customization
The ASA uses customization objects to define the appearance of user screens. A customization object is compiled from an XML file which contains XML tags for all the customizable screen items displayed to remote users. The ASA software contains a customization template that you can export to a remote PC. You can edit this template and import the template back into the ASA as a new customization object.
When you export a customization object, an XML file containing XML tags is created at the URL you specify. The XML file created by the customization object named Template contains empty XML tags and provides the basis for creating new customization objects. This object cannot be changed or deleted from cache memory but can be exported, edited, and imported back into the ASA as a new customization object.
Customization Objects, Connection Profiles, and Group Policies
Initially, when a user first connects, the default customization object (named DfltCustomization) identified in the connection profile (tunnel group) determines how the logon screen appears. If the connection profile list is enabled, and the user selects a different group which has its own customization, the screen changes to reflect the customization object for that new group.
After the remote user is authenticated, the screen appearance is determined by whether a customization object has been assigned to the group policy.
Export a Customization Template
When you export a customization object, an XML file is created at the URL you specify. The customization template (named Template) contains empty XML tags and provides the basis for creating new customization objects. This object cannot be changed or deleted from cache memory but can be exported, edited, and imported back into the ASA as a new customization object.
Procedure
| Step 1 | Export a customization object and and make changes to the XML tags:export webvpn customization |
| Step 2 | Import the file as a new object:import webvpn customizationExample:The following example exports the default customization object (DfltCustomization) and creates the XML file named dflt_custom. hostname# export webvpn customization DfltCustomization tftp://209.165.200.225/dflt_custom !!!!!!!!!!!!!!!!INFO: Customization object 'DfltCustomization' was exported to tftp://10.86.240.197/dflt_custom hostname# |
Edit the Customization Template
This section shows the contents of the customization template and has convenient figures to help you quickly choose the correct XML tag and make changes that affect the screens.
You can use a text editor or an XML editor to edit the XML file. The following example shows the XML tags of the customization template. Some redundant tags have been removed for easier viewing:
<custom>
<localization>
<languages>en,ja,zh,ru,ua</languages>
<default-language>en</default-language>
</localization>
<auth-page>
<window>
<title-text l10n="yes"><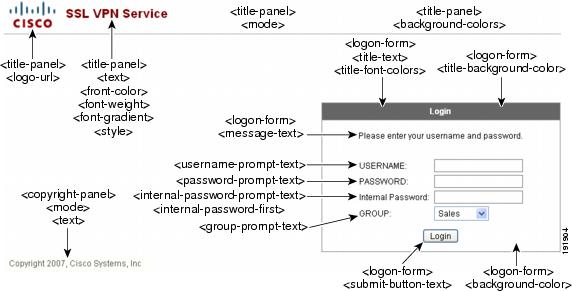
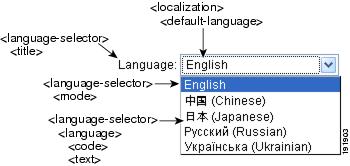
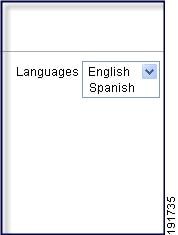
The following figure shows the Language Selector drop-down list that is available on the Logon page, and the XML tags for customizing this feature. All these tags are nested within the higher-level <auth-page> tag.
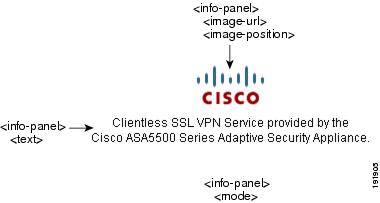
The following figure shows the Information Panel that is available on the Logon page, and the XML tags for customizing this feature. This information can appear to the left or right of the login box. These tags are nested within the higher-level <auth-page> tag.
The following figure shows the Portal page and the XML tags for customizing this feature. These tags are nested within the higher-level <auth-page> tag.
Import a Customization Object
After you edit and save the XML file, import it into the cache memory of the ASA. When you import the customization object, the ASA checks the XML code for validity. If the code is valid, the ASA stores the object in a hidden location in cache memory.
import webvpn customization
The following example shows importing the customization object General.xml from the URL 209.165.201.22/customization and naming it custom1:
hostname# import webvpn customization custom1 tftp://209.165.201.22/customization /General.xml
Accessing tftp://209.165.201.22/customization/General.xml...!!!!!!!!!!!!!!!!!!!!!!!!!!!!!!!!!!!!!!!!!!!!!!!!!!!!!!!!!!!!!!!!!!!!!!!!!!!!!!!!!
Writing file disk0:/csco_config/97/custom1...
!!!!!!!!!!!!!!!!!!!!!!!!!!!!!!!!!!!!!!!!!!!!!!!!!!!!!!!!!!!!!!!!!!!!!!!!!!!!!!!!!
329994 bytes copied in 5.350 secs (65998 bytes/sec)
Apply Customizations to Connection Profiles, Group Policies, and Users
After you create a customization, you can apply the customization to a connection profile (tunnel group), a group, or a user, with the customization command. The options displayed with this command are different depending on the mode you are in.
| Note | After you customize the portal pages, the changes do not take effect until you reload the ASA, or you disable and then enable clientless SSL. |
Procedure
| Step 1 | Switch to Clientless SSL VPN configuration mode:webvpn |
| Step 2 | Switch to either tunnel-group, group-policy, or username Clientless SSL VPN configuration:tunnel-group webvpn OR group-policy webvpn OR username webvpn |
| Step 3 | Apply a customization to a connection profile with name as the name of a customization to apply to the connection profile:customization nameOr apply a customization to a group or user. The following options are included:none disables the customization for the group or user, prevents the value from being inherited, and displays the default Clientless SSL VPN pages.value name is the name of a customization for a group or user.Example:This example enters tunnel-group Clientless SSL VPN configuration mode and enables the customization cisco for the connection profile cisco_telecommutes:hostname(config)# tunnel-group cisco_telecommuters webvpn-attributes hostname(tunnel-group-webvpn)# customization cisco This example enters group policy Clientless SSL VPN configuration mode, queries the security appliance for a list of customizations, and enables the customizationcisco for the group policy cisco_sales: hostname(config)# group-policy cisco_sales attributes hostname(config-group-policy)# webvpn hostname(config-username-webvpn)# customization value ? config-username-webvpn mode commands/options: Available configured customization profiles: DfltCustomization cisco hostname(config-group-webvpn)#customization value cisco This example enters username Clientless SSL VPN configuration mode and enables the customization cisco for the user cisco_employee:hostname(config)# username cisco_employee attributes hostname(config-username)# webvpn hostname(config-username-webvpn)#customization value cisco |
| Step 4 | (Optional) Remove the command from the configuration and remove a customization from the connection profile:[ no] customization name |
| Step 5 | (Optional) Remove the command from the configuration and revert to the default:[no] customization {none | value name} |
| Step 6 | Show a list of existing customizations:customization ? |
Login Screen Advanced Customization
If you prefer to use your own, custom login screen, rather than changing specific screen elements of the login screen we provide, you can perform this advanced customization using the Full Customization feature.
With Full Customization, you provide the HTML for your own login screen, and you insert Cisco HTML code that calls functions on the ASA that create the Login form and the Language Selector drop-down list.
This section describes the modifications you need to make to your HTML code and the tasks required to configure the ASA to use your code.
The following figure shows the standard Cisco login screen that displays to Clientless SSL VPN users. The Login form is displayed by a function called by the HTML code.

The following figure shows the Language Selector drop-down list. This feature is an option for Clientless SSL VPN users and is also called by a function in the HTML code of the login screen.
The following figure shows a simple example of a custom login screen enabled by the Full Customization feature.Figure 8. Example of Full Customization of Login Screens

The following HTML code is used as an example and is the code that displays:
<head>
<meta http-equiv="Content-Type" content="text/html; charset=windows-1252">
<title>New Page 3</title>
<base target="_self">
</head>
<p align="center">
<img border="0" src="/+CSCOU+/cisco_logo.jpg" width="188" height="48"><font face="Snap ITC" size="6" color="#FF00FF">
</font><font face="Snap ITC" color="#FF00FF" size="7"> </font><i><b><font color="#FF0000" size="7" face="Sylfaen"> SSL VPN Service by the Cisco ASA5500</font></b></i></p>
<body onload="csco_ShowLoginForm('lform');csco_ShowLanguageSelector('selector')">
<table>
<tr><td colspan=3 height=20 align=right><div id="selector" style="width: 300px"></div></td></tr>
<tr><td></td><td></td><td></td></tr>
<tr>
<td height="379"></td>
<td height="379"></td>
<td align=middle valign=middle>
<div id=lform >
<p> </p>
<p> </p>
<p> </p>
<p>Loading...</p>
</div>
</td>
</tr>
<tr>
<td width="251"></td>
<td width="1"></td>
<td align=right valign=right width="800">
<img border="1" src="/+CSCOU+/asa5500.jpg" width="660" height="220" align="middle">
</td></tr>
</table>
The indented code injects the Login form and the Language Selector on the screen. The function csco_ShowLoginForm(‘lform’) injects the logon form.csco_ShowLanguageSelector(‘selector’) injects the Language Selector.
Modify Your HTML File
Procedure
| Step 1 | Name your file logon.inc. When you import the file, the ASA recognizes this filename as the logon screen. |
| Step 2 | Modify the paths of images used by the file to include /+CSCOU+/.Files that are displayed to remote users before authentication must reside in a specific area of the ASA cache memory represented by the path /+CSCOU+/. Therefore, the source for each image in the file must include this path.For example:src=”/+CSCOU+/asa5520.gif” |
| Step 3 | Insert the special HTML code below. This code contains the Cisco functions, described earlier, that inject the login form and language selector onto the screen. <body onload="csco_ShowLoginForm('lform');csco_ShowLanguageSelector('selector')"> <table> <tr><td colspan=3 height=20 align=right><div id="selector" style="width: 300px"></div></td></tr> <tr><td></td><td></td><td></td></tr> <tr> <td height="379"></td> <td height="379"></td> <td align=middle valign=middle> <div id=lform > <p> </p> <p> </p> <p> </p> <p>Loading...</p> </div> </td> </tr> <tr> <td width="251"></td> <td width="1"></td> <td align=right valign=right width="800"> <img border="1" src="/+CSCOU+/asa5500.jpg" width="660" height="220" align="middle"> </td></tr> </table> |
Customize Bookmark Help
The ASA displays help content on the application panels for each selected bookmark. You can customize those help files or create help files in other languages. You then import them to flash memory for display during subsequent sessions. You can also retrieve previously imported help content files, modify them, and reimport them to flash memory.
Each application panel displays its own help file content using a predetermined filename. The prospective location of each is in the /+CSCOE+/help/language/ URL within flash memory of the ASA. The following table shows the details about each of the help files you can maintain for VPN sessions.
| Application Type | Panel | URL of Help File in Flash Memory of the Security Appliance | Help File Provided By Cisco in English? |
|---|---|---|---|
| Standard | Application Access | /+CSCOE+/help/language/app-access-hlp.inc | Yes |
| Standard | Browse Networks | /+CSCOE+/help/language/file-access-hlp.inc | Yes |
| Standard | AnyConnect Client | /+CSCOE+/help/language/net-access-hlp.inc | Yes |
| Standard | Web Access | /+CSCOE+/help/language/web-access-hlp.inc | Yes |
| Plug-in | MetaFrame Access | /+CSCOE+/help/language/ica-hlp.inc | No |
| Plug-in | Terminal Servers | /+CSCOE+/help/language/rdp-hlp.inc | Yes |
| Plug-in | Telnet/SSH Servers | /+CSCOE+/help/language/ssh,telnet-hlp.inc | Yes |
| Plug-in | VNC Connections | /+CSCOE+/help/language/vnc-hlp.inc | Yes |
language is the abbreviation of the language rendered by the browser. This field is not used for file translation; it indicates the language used in the file. To specify a particular language code, copy the language abbreviation from the list of languages rendered by your browser. For example, a dialog window displays the languages and associated language codes when you use one of the following procedures:
- Open Internet Explorer and choose Tools > Internet Options > Languages > Add.
- Open Mozilla Firefox and choose Tools > Options > Advanced > General, click Choosenext to Languages, and click Select a language to add.
- Import a Help file to Flash Memory
- Export a Previously Imported Help File from Flash Memory
- Understand Language Translation
- Create Translation Tables
- Reference the Language in a Customization Object
- Change a Group Policy or User Attributes to Use the Customization Object
Import a Help file to Flash Memory
Procedure
| Import a help content file to flash memory for display in Clientless SSL VPN sessions.import webvpn webcontent destination_url source_urldestination_url is the string in the URL of Help File in Flash Memory of the Security Appliance column.source_url is the URL of the file to import. Valid prefixes are ftp://, http://, and tftp://. |
Example
This example copies the help file app-access-help.inc to flash memory from the TFTP server at 209.165.200.225.The URL includes the abbreviation en for the English language:
hostname# import webvpn webcontent /+CSCOE+/help/en/app-access-hlp.inc tftp://209.165.200.225/app-access-hlp.inc
Export a Previously Imported Help File from Flash Memory
Procedure
| Retrieve a previously imported help content file for subsequent edits.export webvpn webcontent source_url destination_urlsource_url is the string in “URL of Help File in Flash Memory of the Security Appliance.”destination_url is the target URL . Valid prefixes are ftp:// and tftp://. The maximum number of characters is 255. |
Example
This example copies the English language help file file-access-hlp.inc displayed on the Browser Networks panel to TFTP Server 209.165.200.225.
hostname# export webvpn webcontent /+CSCOE+/help/en/file-access-hlp.inc tftp://209.165.200.225/file-access-hlp.inc
Understand Language Translation
The ASA provides language translation for the entire Clientless SSL VPN session. This includes login, logout banners, and portal pages displayed after authentication such as plugins and AnyConnect. Functional areas and their messages that are visible to remote users are organized into translation domains. The following table shows the translation domains and the functional areas translated.
Language Translation Domain Options
| Translation Domain | Functional Areas Translated |
|---|---|
| AnyConnect | Messages displayed on the user interface of the Cisco AnyConnect VPN client. |
| banners | Message displayed when VPN access is denied for a clientless connection. |
| CSD | Messages for the Cisco Secure Desktop (CSD). |
| customization | Messages on the logon and logout pages, portal page, and all the messages customizable by the user. |
| plugin-ica | Messages for the Citrix plug-in. |
| plugin-rdp | Messages for the Remote Desktop Protocol plug-in. |
| plugin-rdp2 | Messages for the Java Remote Desktop Protocol plug-in. |
| plugin-telnet,ssh | Messages for the Telnet and SSH plug-in. |
| plugin-vnc | Messages for the VNC plug-in. |
| PortForwarder | Messages displayed to Port Forwarding users. |
| url-list | Text that user specifies for URL bookmarks on the portal page. |
| webvpn | All the layer 7, AAA and portal messages that are not customizable. |
The ASA includes a translation table template for each domain that is part of standard functionality. The templates for plug-ins are included with the plug-ins and define their own translation domains.
You can export the template for a translation domain, which creates an XML file of the template at the URL you provide. The message fields in this file are empty. You can edit the messages and import the template to create a new translation table object that resides in flash memory.
You can also export an existing translation table. The XML file created displays the messages you edited previously. Reimporting this XML file with the same language name creates a new version of the translation table object, overwriting previous messages.
Some templates are static, but some change based on the configuration of the ASA. Because you can customize the logon and logout pages, portal page, and URL bookmarks for clientless users, the ASA generates the customization and url-list translation domain templates dynamically, and the template automatically reflects your changes to these functional areas.
After creating translation tables, they are available to customization objects that you create and apply to group policies or user attributes. With the exception of the AnyConnect translation domain, a translation table has no affect, and messages are not translated on user screens until you create a customization object, identify a translation table to use in that object, and specify that customization for the group policy or user. Changes to the translation table for the AnyConnect domain are immediately visible to AnyConnect client users.
Create Translation Tables
You can create translation tables in both single context mode and multi-context mode:
Procedure
| Step 1 | Export a translation table template to a computer.export webvpn translation-tableExample:This example shows available translation table templates and exports them for the customization domain, which affects messages displayed for users in Clientless SSL VPN sessions. The filename of the XML file created is portal (user-specified) and contains empty message fields. hostname# show import webvpn translation-table Translation Tables' Templates: customization AnyConnect PortForwarder url-list webvpn Citrix-plugin RPC-plugin Telnet-SSH-plugin VNC-plugin Translation Tables: hostname# export webvpn translation-table customization template tftp://209.165.200.225/portal |
| Step 2 | Edit the translation table XML file.Example:This example shows a portion of the template that was exported as portal. The end of this output includes a message ID field (msgid) and a message string field (msgstr) for the message which is displayed on the portal page when a user establishes a Clientless SSL VPN session. The complete template contains many pairs of message fields. # Copyright (C) 2006 by Cisco Systems, Inc. # #, fuzzy msgid "" msgstr "" "Project-Id-Version: ASA\n" "Report-Msgid-Bugs-To: vkamyshe@cisco.com\n" "POT-Creation-Date: 2007-03-12 18:57 GMT\n" "PO-Revision-Date: YEAR-MO-DA HO:MI+ZONE\n" "Last-Translator: FULL NAME <EMAIL@ADDRESS>\n" "Language-Team: LANGUAGE <LL@li.org>\n" "MIME-Version: 1.0\n" "Content-Type: text/plain; charset=UTF-8\n" "Content-Transfer-Encoding: 8bit\n" #: DfltCustomization:24 DfltCustomization:64 msgid "Clientless SSL VPN Service" msgstr "" |
| Step 3 | Import the translation table.import webvpn translation-tableExample:This example imports the XML file. es-us is the abbreviation for Spanish spoken in the United States. hostname# import webvpn translation-table customization language es-us tftp://209.165.200.225/portal hostname# !!!!!!!!!!!!!!!!!!!!!!!!!!!!!!!!!!! hostname# show import webvpn translation-table Translation Tables' Templates: AnyConnect PortForwarder customization keepout url-list webvpn Citrix-plugin RPC-plugin Telnet-SSH-plugin VNC-plugin Translation Tables: es-us customization If you import a translation table for the AnyConnect domain, your changes are effective immediately. If you import a translation table for any other domain, you must create a customization object, identify the translation table to use in that object, and specify that customization object for the group policy or user. |
Reference the Language in a Customization Object
This section describes how to export the customization template, edit it, and import it as a customization object so that you can refer to it.
Before you begin
For the customization object to call these translation tables correctly, the tables must have been previously imported using the same names. These names must be compatible with language options of the browser.
Procedure
| Step 1 | Export a customization template to a URL where you can edit it.export webvpn customization templateThis example exports the template and creates the copy sales at the URL specified.hostname# export webvpn customization template tftp://209.165.200.225/sales |
| Step 2 | Two areas of XML code in the customization template pertain to translation tables. Edit the customization template and reference the previously-imported translation table.This example specifies the translation table to use.The <languages> tag in the XML code is followed by the names of the translation tables. In this example, they are en, ja, zh, ru, and ua.The <default-language> tag specifies the language that the remote user first encounters when connecting to the ASA. In the example code above, the language is English. <localization> <languages>en,ja,zh,ru,ua</languages> <default-language>en</default-language> </localization> This example affects the display of the Language Selector and includes the <language selector> tag and the associated <language> tags that enable and customize the Language Selector:The <language-selector> group of tags includes the <mode> tag that enables and disables the displaying of the Language Selector and the <title> tag that specifies the title of the drop-down box listing the languages.The <language> group of tags includes the <code> and <text> tags that map the language name displayed in the Language Selector drop-down box to a specific translation table. <auth-page> .... <language-selector> <mode>enable</mode> <title l10n="yes">Language:</title> <language> <code>en</code> <text>English</text> </language> <language> <code>es-us</code> <text>Spanish</text> </language> </language-selector> |
| Step 3 | Save the file after making your changes. |
| Step 4 | Import the customization template as a new object.import webvpn customizationExample: |
| Step 5 | Show the new customization object sales.show import webvpn customizationExample:hostname# import webvpn customization sales tftp://209.165.200.225/sales hostname# !!!!!!!!!!!!!!!!!!!!!!!!!!!!!!!!!!! |
Change a Group Policy or User Attributes to Use the Customization Object
This section describes how to activate your changes for specific groups or users.
Procedure
| Step 1 | Switch to Clientless SSL VPN configuration mode.webvpn |
| Step 2 | Switch to group-policy Clientless SSL VPN configuration mode.group-policy webvpn |
| Step 3 | Enable the customization object.customization |
Example
This example shows the customization object sales enabled in the group policy sales.
hostname(config)# group-policy sales attributes
hostname(config-group-policy)# webvpn
hostname(config-group-webvpn)# customization value sales
评论